Form notes / 17 October 2026
A Square Top, an Open Base
Follow the edge. Read the space beneath it.
A photographed form, read closely. No invented development history.
Read the study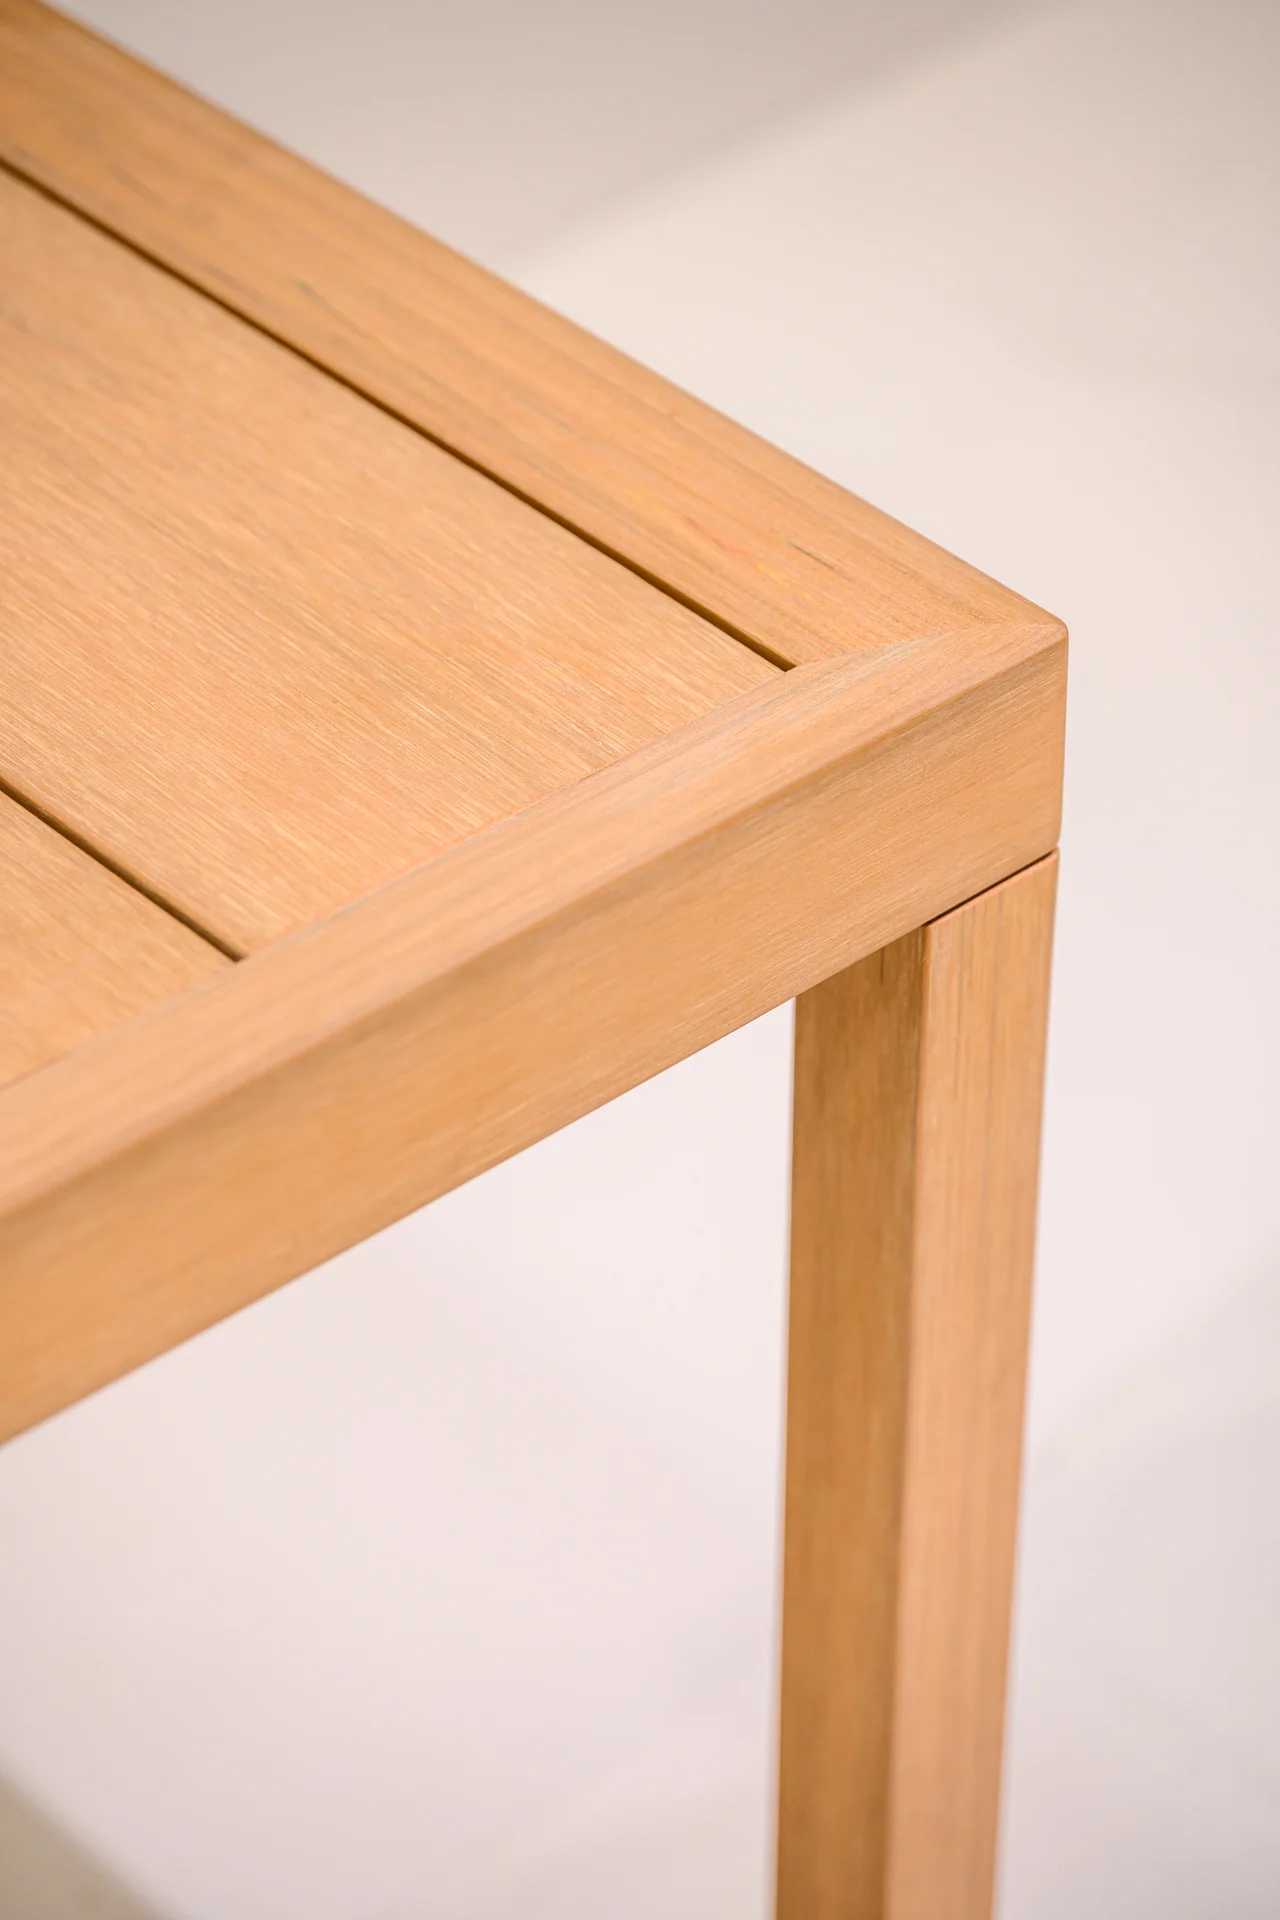
Begin with the visible.
A square side table offers a quiet place to begin. A warm-toned border surrounds the tabletop. Narrow lines divide the surface within it. Below, straight legs leave the sides open, while low members cross near the floor. The form can be read from its outside edge down to its base.
This study looks closely at that arrangement. Two photographs from the Sumparwood exhibition archive provide an overall view and a closer view of a tabletop corner. They show a physical object, not a proposed digital model. They do not document its development history or establish how it performs outdoors.
The question here is precise: how do the top, border and supporting frame read together? The photographs let us begin that conversation. A drawing, a physical review and a defined brief would be needed to take it further.
Follow the outside line
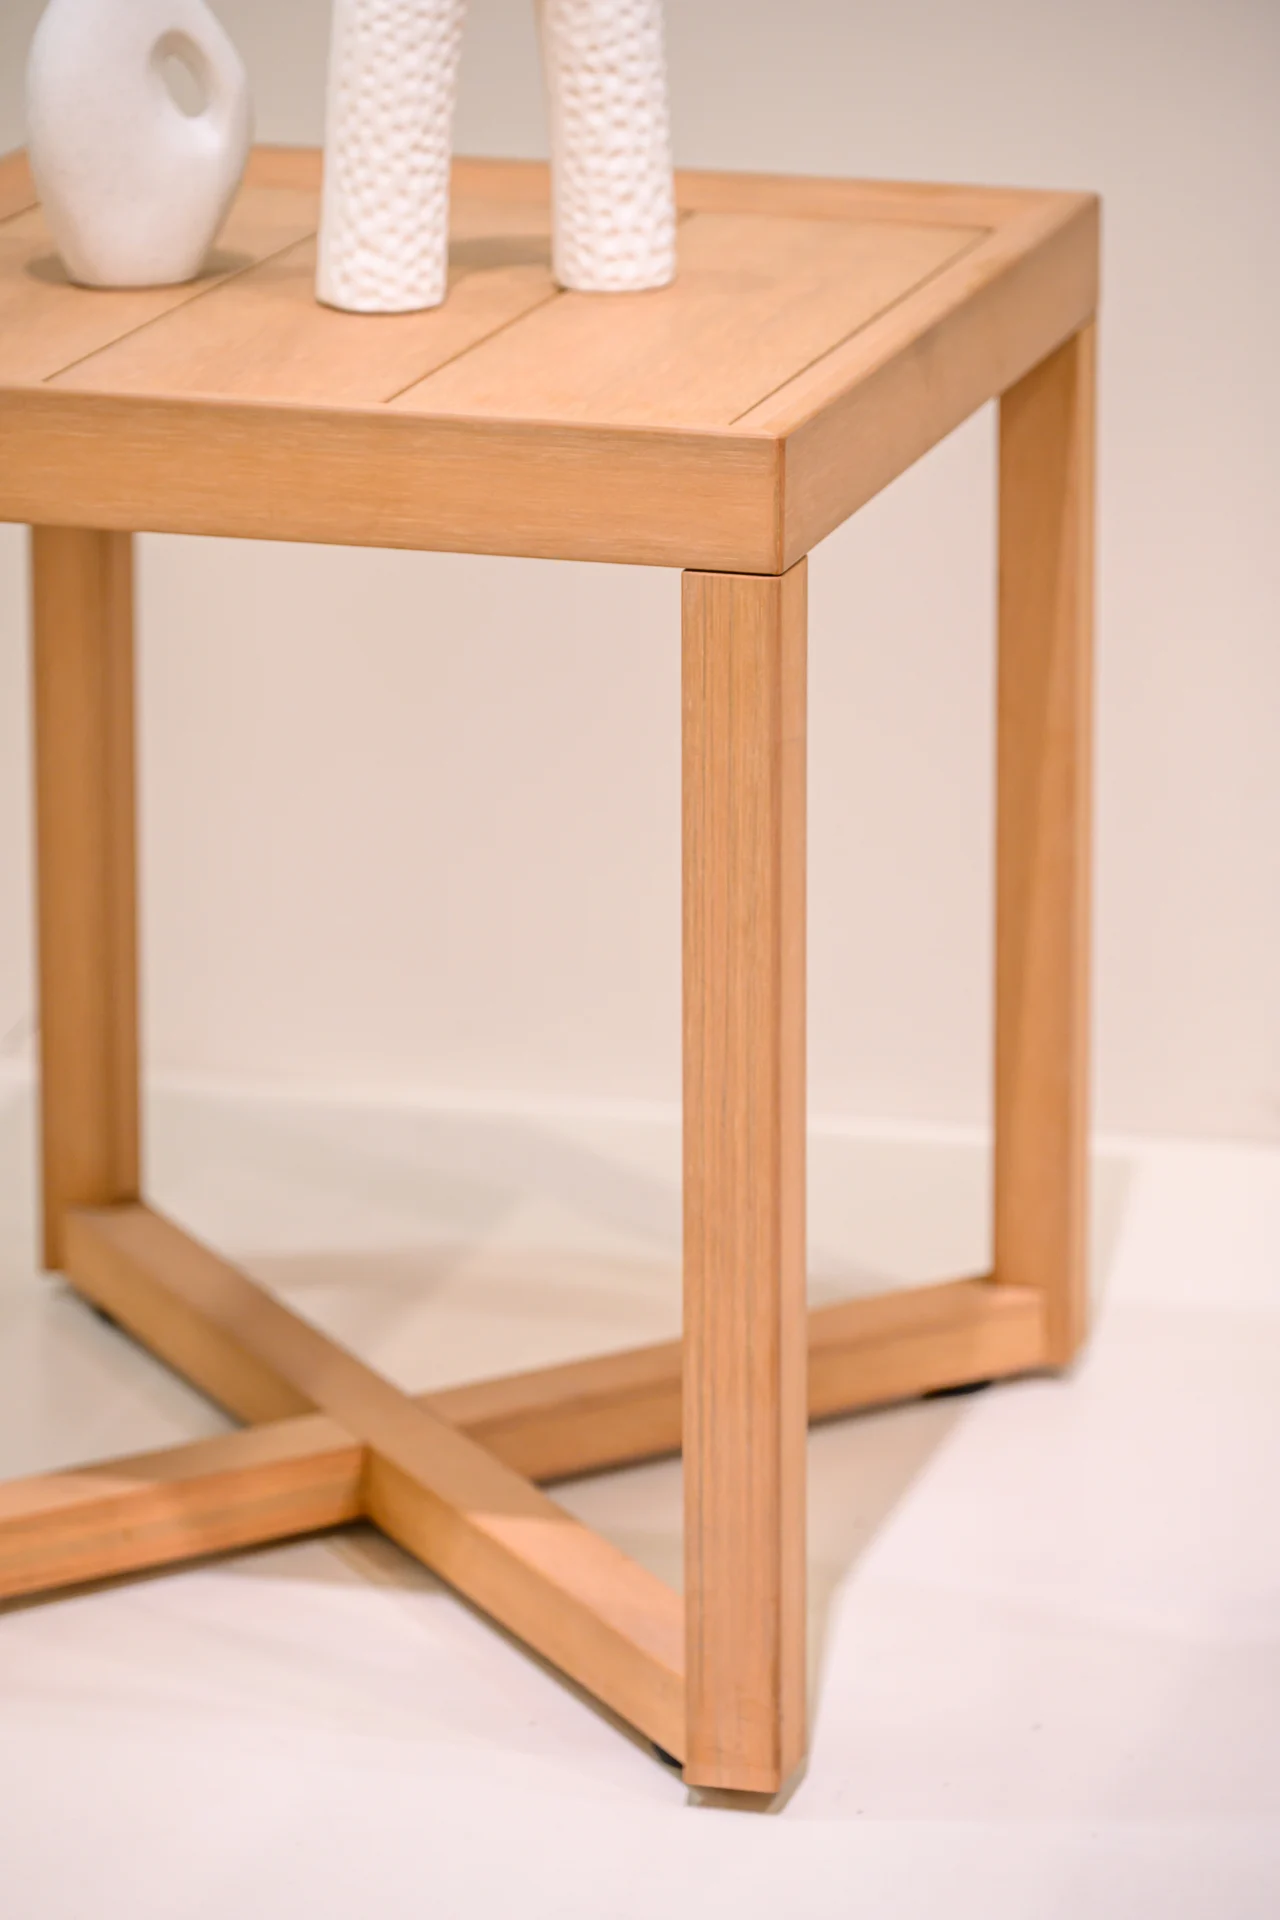
In the overall photograph, the nearest tabletop corner is clear. The horizontal border changes direction above a vertical leg. The surfaces share a warm colour, but the change in orientation remains visible. The eye can follow the tabletop edge without losing the position of the support beneath it. [1]
This is the first relationship worth keeping in view. The border does more than outline the surface in the photograph. Its depth gives the top a distinct band when seen from the side. The slender lines across the upper plane then sit within that band rather than continuing across its outer face.
We can describe this visual order without claiming why the original maker chose it. The photograph does not contain a design brief. It does, however, give another design team a clear reference: an uninterrupted outside outline paired with a visibly divided interior surface.
Look inside the border
The tabletop is not presented as one unbroken visual field. Parallel narrow openings or dark lines appear between its long surface elements. A further line separates the inner surface from the surrounding frame. In the corner photograph, these relationships are easier to distinguish than in the full view. [2]
Their appearance should not be turned into an unsupported technical explanation. The photographs do not establish drainage capacity, expansion allowance or a specified assembly gap. Nor do they identify the material composition beneath the visible finish. Those are questions for records and a physical sample, not conclusions from an image.
For the present study, the useful observation is simpler. The top brings repetition into a square outline. Each long element gives the surface a direction, while the border turns around it. The resulting contrast is between a repeated interior rhythm and one continuous perimeter.
Pause at the corner
The detail photograph brings the viewer close to the meeting of two border members. Their visible ends form an angled seam at the corner. A leg sits below the border, with a narrow dark line visible between the horizontal and vertical parts. These are the features the image makes available for discussion. [2]
The seam does not reveal the full connection. We cannot see its internal fixing, any adhesive, the underside of the corner or the order in which the parts were assembled. Calling it a particular joint system would go beyond the record. A connection drawing would answer different questions from this photograph.
That distinction suggests a useful next conversation. One team may want to preserve the clean outline. Another may need access to a fixing or a replaceable component. A further sample could make those requirements visible together. That is a possible development question, not a claim about a change already made to this table.
Read the space below
The overall view shows long open areas between the legs. Near the floor, lower members cross and connect the visible sides of the base. Their placement introduces another horizontal line, separate from the tabletop border. The furniture is therefore read at two levels: the working surface above and the open frame below. [1]
From this angle, the crossed members are a strong part of the composition. They draw attention through the open sides instead of leaving the space entirely empty. They should not be described as proven bracing or as evidence of stability. Their structural role would need a drawing and appropriate assessment.
For a future brief, this lower zone could become a discussion about use as well as appearance. Where would a person stand beside the object? What surrounding furniture would share the space? Which surfaces would need to be reached for cleaning? The photograph starts those questions but cannot answer them for an unknown installation.
Keep scale honest
Objects placed on the tabletop help the photograph read as a furnished scene. They do not supply a reliable measurement reference. The available images contain no ruler, dimensioned drawing or confirmed product schedule. This study therefore gives no height, width, load rating or seating relationship for the table.
That matters because proportion and dimensions are not the same kind of information. We can compare the apparent depth of the border with the visible width of a leg in this view. We cannot use that comparison to issue a production dimension. Perspective also changes how the near and far parts appear.
A design team taking this reference into a new brief should record its own intended dimensions separately. The earlier Journal on collection size variants discusses that wider task. Here the focus stays on one photographed form, rather than implying that this table belongs to a verified family of sizes.
Let colour remain a reference
Both images show a warm, pale brown surface with visible directional markings. Light falls differently across the top, the front border and the vertical leg. The same general colour therefore appears lighter in some areas and deeper in others. The photographs are useful for reading that change across the form. [1, 2]
They are not a calibrated finish specification. This study does not assign the table a named Sumparwood finish from its screen colour. It also does not infer species, ingredients, coating chemistry or weathering behaviour from the visible markings. Those details require an identified sample and the relevant product information.
For a new material conversation, compare the intended surface against the physical Sample Box. Record which finish is being considered and under what light it was reviewed. The purpose is to give the next discussion a shared reference, not to promise that a photograph predicts the appearance of every finished piece.
Ask for the view that is missing
The two images make the upper corner and much of the base visible. Neither gives a complete underside view. Neither isolates a disassembled connection or shows the table during making. The detail image adds information about the visible border, but it does not replace those missing views.
If the next task concerns assembly access, request an underside photograph or drawing. If it concerns the feel of an edge, examine the physical edge. If it concerns performance, agree the intended use and the relevant evidence before making a claim. Different questions need different records.
This is why a close-up should have a named purpose. More photographs are not automatically a better case. The useful addition is the view that resolves a real uncertainty. For this object, an underside record tied to the same identified table would be more informative than another decorative view from above.
A three-part reading sheet
Use the following sheet to keep the conversation anchored to the object. The first column names the part. The next three record what is visible, identify what remains open and name a record that could help. It is a discussion aid, not an inspection pass or a statement that development has occurred.
On a small screen, scroll across to read all four columns.
| Part | Visible in the photographs | Still to establish | Useful next record |
|---|---|---|---|
| Top | Repeated long surface elements inside a square border | Dimensions and specified gaps | Identified top drawing |
| Corner | Angled border seam above a leg | Internal connection and access | Underside view and connection detail |
| Base | Open sides and crossed lower members | Connection arrangement and intended use | Base drawing and a use brief |
| Surface | Warm tone and directional markings | Exact material and approved finish | Labelled physical sample |
The sheet deliberately leaves technical answers open. It helps a designer ask a workshop for one relevant piece of information at a time. It should not be filled with assumed specifications simply to make the case look complete.
Begin the next brief with one relationship
The strongest starting point in these photographs is the meeting of the top border and the supporting frame. The full view establishes the arrangement. The corner view lets us pause at its edge. Together they provide a small, specific subject for a material and construction conversation.
They do not show a client commission, a sequence of revisions or a verified result. Those facts remain outside this study. If the original brief and workshop records become available, they can support a different kind of case: one that explains what was asked, what changed and what the team actually learned.
Until then, the object can still be useful without an invented history. Start with the visible relationship. Name what a new brief needs to resolve. Bring the drawing, the material sample and the physical detail into the same discussion. Visit Workshop or request the Sample Box to begin a material conversation around your own application.